Marketplace applications give users the ability to share and sell products online. In this tutorial we will build a marketplace application for software developers to sell code, tech articles and full applications. We'll be using Tailwind to style the app, and state management library Pinia to create type safe Vue Stores.
What We Will Build
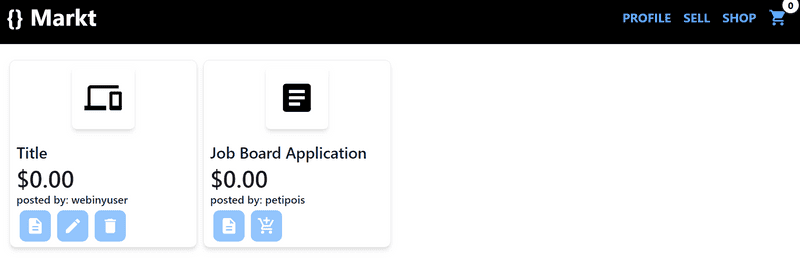
Here is a mockup of the marketplace application. This is the product page along with buttons that will change based on whether a user is the seller of the item.
This article will focus on the Webiny CMS and how to connect it to your Vue.js application. We will be using:
- Vue.js using Vite
- GraphQL
- Tailwind CSS
- Pinia
What You Will Need
- Basic knowledge of GraphQL, Vue.js and Tailwind CSS
- Amazon AWS Account
- Webiny CMS installed on your local Machine
We Will Learn:
- Webiny Headless CMS
- Integrating Webiny CMS using Vue Apollo
- How to use Pinia for state management
We will focus on Webiny CMS first by creating our Content Models to be used in the Vue Application.
NOTE: We will not be integrating any authentication in this tutorial, however it is strongly advised that for production code you implement a robust user authentication flow.
Create a New Webiny Project
In order to create a Webiny project you must have Node.js and AWS account, more prerequisites can be found in the documentiation - https://www.webiny.com/docs/get-started/install-webiny
Open the Terminal in the Command Line and **cd** into the directory where you want to keep your Webiny project. Next, run the command line below:
npx create-webiny-project [your project name]
Once you have created the project you need to deploy it to AWS so it can be built and we can access all the features Webiny provides.
yarn webiny deploy
Once the deployment has finish, you will be presented with the URL for your webiny project where you can access the Admin Dashboard and start creating the backend for the project.
Creating Categories
For this application we will have three types of Products: Code Snippets, Tutorials and Full Applications. We will start the content models by creating our Categories Content Model.
In the Webiny Headless CMS menu choose Models then New Model, give your model the name Categories and a description
Once created we must now flesh out our model with the information we need to create a category. You will be presented with the drag and drop user interface for the model. The category content model will have two text fields:
- Title [text] - Name of the category
- Icon [text] - the icon name that corresponds to our Google Material Icons
Once you have added these, Save the Model
Under the Headless CMS scroll down until you find the Categories model you just created.
Next create a New Entry and populate the fields:
- title: Code Snippet
- icon: code
Creating Sellers Model
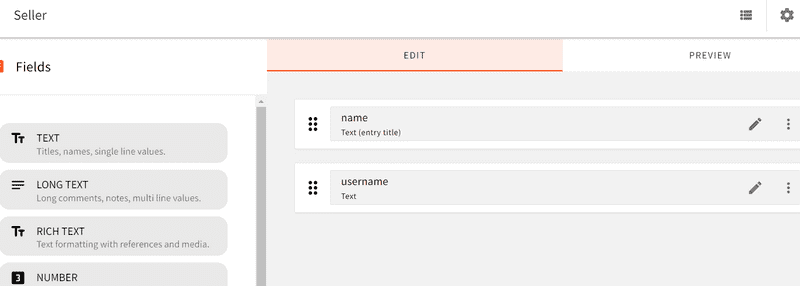
Let’s create the Content Model for Sellers, we will need a Name and Username so that sellers can manage their products. The Seller Model will have two fields
- Name - Text
- Username - Text
Once you have saved the Sellers Model, create an entry.
Creating the Products Model
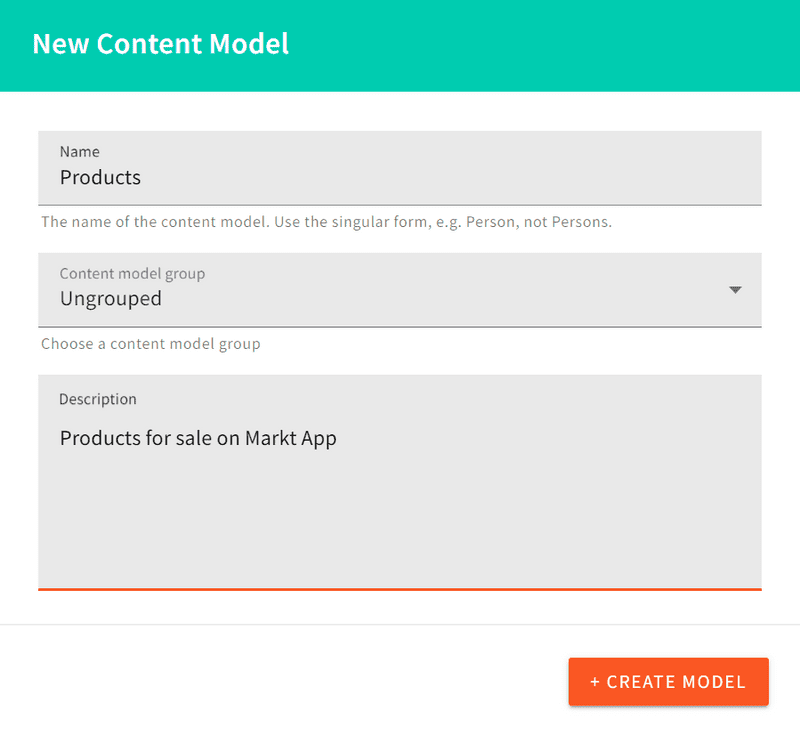
Let’s create the Content Model for our Products. This will house all the information we need for each product in our App. Create a new Content Model called Products
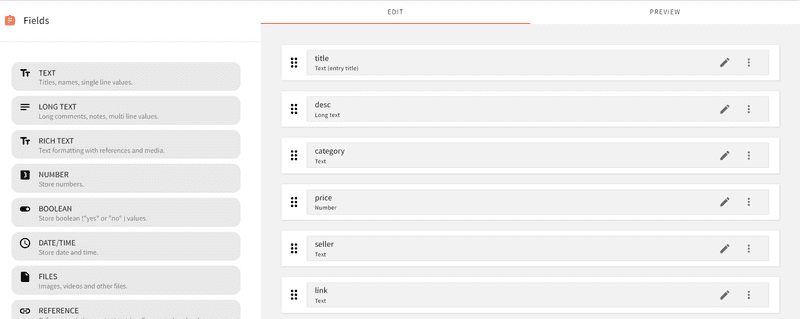
The model will contain these fields:
- Title: Text
- Desc: Text
- Price: Number
- Category: Text
- Seller: Text
- Link: Text
This is what the Model should look like when completed:
NOTE: This model could also contain a product image and give users the ability to sell all sorts of products but the tutorial will not be implementing this feature.
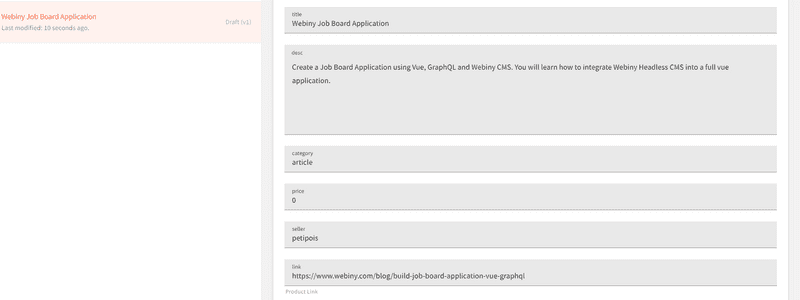
Let’s create a few entries on the Webiny CMS. We will be able to create them from the Vue.js application later.
Now that we have all our models and a few entries we will get the API Keys we need to access the content from the Vue.js application.
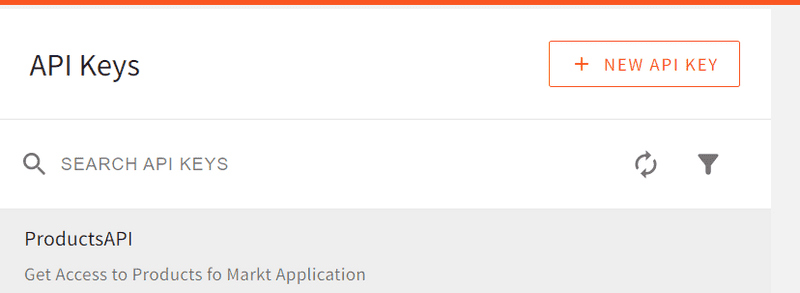
Under settings open the API Keys option
Create a new api key, in this example I have named the api key ProductsAPI
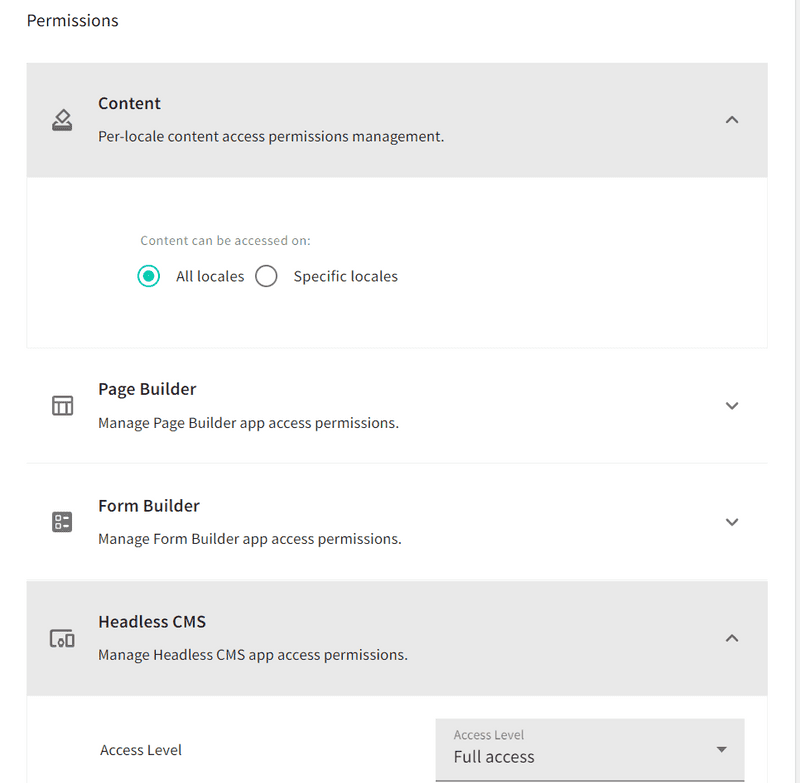
For the user to have the ability to read, write and delete entries we need to change the access level to Full Access.
Note: If you want to restrict certain models from the user you can choose Custom Access.
Once you have saved the API it will provide you with a token. Copy this token and put it in a safe place we will use this later.
Creating Our Vue Application
We will be using Vite.js to create our project. In a separate location to your webiny application, using the Command prompt terminal, create a new Vue project and following the prompts to create a vue application using javascript.
npm create vite@latest markt-webiny
cd markt-webiny
npm install
We will next need to install a few dependencies for our app, Vue Router, Vue Apollo and Tailwind CSS.
Adding Vue Router
We will be using vue-router for our application. Install it by opening the terminal inside Visual Studio Code and typing this command
npm install vue-router@4
Next, inside the index.js file that we created under the router folder create the routes we need for our application.
import { createRouter, createWebHistory } from "vue-router";
import Home from "../views/Home.vue";
import Cart from "../views/Cart.vue";
import Products from "../views/Products.vue";
import Create from "../views/Create.vue";
const routes = [
  {
    path: "/",
    name: "Home",
    component: Home,
  },
  {
    path: "/new",
    name: "Create",
    component: Create,
    meta: {
      requiresAuth: true,
    },
  },
  {
    path: "/products",
    name: "Products",
    component: Products,
  },
  {
    path: "/cart",
    name: "Cart",
    component: Cart,
  },
];

const router = createRouter({
  history: createWebHistory(),
  routes,
});

/* Check that the user is logged in if not show alert and redirect to the home page */
router.beforeEach((to, from, next) => {
  if (to.matched.some((record) => record.meta.requiresAuth)) {
    if (localStorage.getItem("user")) {
      next();
    } else {
      alert("You must register to sell products");
      next("/");
    }
  } else {
    next();
  }
});
export default router;
We also added a route guard so that we can determine if a user can manage a product or not.
Adding Tailwind CSS
Let’s also add Tailwind CSS to our Vite application the documentation for this can be found here.
Install Tailwind CSS with Vite - Tailwind CSS
You could add you own styling and skip this step if you want.
Installing Vue Router & Vue Apollo
npm i vue-router@4
npm install --save graphql graphql-tag @apollo/client
npm install --save @vue/apollo-composable
Open the index.js file under src/routes and enter the code below:
/** router/index.js */
import { createRouter, createWebHistory } from "vue-router";
import Home from '../views/Home.vue'
import Cart from '../views/Cart.vue'
import Products from '../views/Products.vue'
import Product from '../views/Product.vue'
import Create from '../views/Create.vue'
const routes = [
  {
    path: "/",
    name: "Home",
    component: Home,
  },
  {
    path: "/new",
    name: "Create",
    component: Create,
  },
  {
    path: "/products",
    name: "Products",
    component: Products,
  },
  {
    path: "/cart",
    name: "Cart",
    component: Cart,
  },
];

const router = createRouter({
  history: createWebHistory(),
  routes,
});

export default router;
Now that we have created our routes let’s integrate this in our application using the main.js file.
/** main.js */
import { createApp } from "vue";
import "./index.css";
import { DefaultApolloClient } from "@vue/apollo-composable";
import {
  ApolloClient,
  createHttpLink,
  InMemoryCache,
} from "@apollo/client/core";

import App from "./App.vue";
import router from "./router/index.js";

const httpLink = createHttpLink({
  uri: import.meta.env.VITE_CMSAPI,
  headers: {
    Authorization: "Bearer " + import.meta.env.VITE_TOKEN,
  },
});
const cache = new InMemoryCache();
const apolloClient = new ApolloClient({
  link: httpLink,
  cache,
});
createApp(App)
  .provide(DefaultApolloClient, apolloClient)
  .use(router)
  .mount("#app");
Environment Variables
You will need to create an .env file to contain your token and api keys for this application.
VITE_TOKEN=[YOUR PRODUCTSAPI TOKEN]
VITE_CMSAPI=[your webiny api url]
If you've misplaced your Webiny API URL, type yarn webiny info in your Webiny directory, or navigate to the API Playground using the user interface.
NOTE: In this example code, we are using your API token on the client. This is not a secure solution. If you intend using this code, please integrate a more secure way to use your API key, perhaps using a server-side function or a proxy.
Adding Icons
We will be using Google Material Icons to add some style to each product category.
Open the index.html and add link the Material Icons stylesheet
<!DOCTYPE html>
<html lang="en">
  <head>
    <meta charset="UTF-8" />
    <link rel="icon" type="image/svg+xml" href="/vite.svg" />
    <link href="https://fonts.googleapis.com/icon?family=Material+Icons" rel="stylesheet">
    <meta name="viewport" content="width=device-width, initial-scale=1.0" />
    <title>Webiny Markt App</title>
  </head>
  <body>

    <div id="app"></div>
    <script type="module" src="/src/main.js"></script>
  </body>
</html>
State Management With Pinia
Pinia 🍍 is a state management library that makes it easy to manage data across our application. You can learn more about Pinia library on their website.
Sellers Model
First we will load all of them into our Pinia Store and then we will add the functionality in our Home.vue file to check if the username in the input field matches one the Sellers Model. We will make the query to list all the data in the Sellers Model then we will test the syntax in the API Playground.
The API Playground is one of the great features of Webiny — you can learn more about it from the Webiny Documentation. We will use it to test our GraphQL syntax to access and manage the data from our Content Models.
In the API Playground we have a GraphQL editor where we can test any GraphQL syntax on our Models. There are four different APIs listed: Main, Manage, Read and Preview. We are going to be using the Manage API for this tutorial.
{
  listSellers {
    data {
      id
      name
      username
    }
  }
}
Enter the GraphQL Query above on the left panel, and click the Play button to test it. You should see the results shown below:
Now we know the query was successful we can create a new file under the stores folder called users.js and enter the code below:
/* stores/uses.js */

import { defineStore } from "pinia";
import { reactive, ref } from "vue";

import { useQuery } from "@vue/apollo-composable";
import gql from "graphql-tag";

export const useUserStore = defineStore("user", () => {
  const sellers = reactive([]);
  let allSellers;
  let user = ref({});
  /* Check if we already are logged in*/
  if (localStorage.getItem("user")) {
    user = JSON.parse(localStorage.getItem("user"));
  }

  /* List all the sellers in the Webiny CMS*/
  const loadSellers = () => {
    const ALL_SELLER_QUERY = gql`
      query {
        listSelles {
          data {
            id
            name
            username
          }
        }
      }
    `;

    const { loading, result, error } = useQuery(ALL_SELLER_QUERY);
    if (result) {
      allSellers = result;
    }
  };

  /* Update the sellers array with Webiny CMS data*/
  const updateSellers = () => {
    sellers.value = allSellers.value.listSelles.data;
  };
  const login = (username) => {
    updateSellers();
    sellers.value.forEach((element) => {
      if (element.username === username.value) {
        let loadedUser = {
          id: element.id,
          name: element.name,
          username: element.username,
        };
        user = loadedUser;
        localStorage.setItem("user", JSON.stringify(user));
      }
    });

    window.location.reload();
  };
  const logout = () => {
    localStorage.removeItem("user");
    window.location.reload();
  };
  return {
    user,
    login,
    logout,
    loadSellers,
  };
});
Keeping Track of the User's Cart
We will create our cart store to keep track of the user’s cart and their purchases through our application. We will store all of these into localStorage.
/** stores/cart.js */
import { defineStore } from "pinia";
import { computed, reactive, ref } from "vue";

export const useCartStore = defineStore("useCartStore", () => {
  const cart = reactive([]);
  const purchases = reactive([]);
  /* If there any purchases push them to the purchases array* */
  if (localStorage.getItem("purchases")) {
    let savedPurchases = JSON.parse(localStorage.getItem("purchases"));
    savedPurchases.forEach((element) => {
      purchases.push(element);
    });
  }
  let currentUser;
  if (localStorage.getItem("user")) {
    currentUser = JSON.parse(localStorage.getItem("user"));
  }

  /* If there any items stored in the cart push them to the cart array* */
  if (localStorage.getItem("cart")) {
    let savedCart = JSON.parse(localStorage.getItem("cart"));
    savedCart.forEach((element) => {
      cart.push(element);
    });
  }
  const addToCart = (product) => {
    if (cart.length == 0) {
      cart.push(product);
    } else {
      let hasProduct = cart.some((item) => item["id"] === product.id);
      if (hasProduct) {
        alert("This product is already in your cart");
      } else {
        cart.push(product);
      }
    }
    localStorage.setItem("cart", JSON.stringify(cart));
  };
  const removeFromCart = (id) => {
    let newCart = cart.filter((product) => {
      return product.id != id;
    });
    localStorage.setItem("cart", JSON.stringify(newCart));
    window.location.reload();
  };
  const savePurchases = (product) => {
    purchases.push({
      currentUser,
      ...product,
    });
    localStorage.setItem("purchases", JSON.stringify(purchases));
    removeFromCart(product.id);
  };
  const total = computed(() => {
    let temp = 0;
    cart.forEach((element) => {
      temp += parseFloat(element.price);
    });
    return temp;
  });
  return { cart, addToCart, total, removeFromCart, purchases, savePurchases };
});
Building the Home Page
Now that we have both the user and cart Pinia stores we can create our Home page of our application. This will show a login screen if there is no user in the localStorage or the User’s profile and purchases if logged in. Reminder: don't use this method of authentication in a production application.
/** views/Home.vue */
<template>
  <div v-if="!store.user.username"
    class="p-4 m-4 mx-auto w-full max-w-sm bg-white rounded-lg border border-gray-200 shadow-md">
    <form class="space-y-6" @submit.prevent="handleLogin()">
      <h5 class="text-xl font-medium text-gray-900">Markt Login </h5>
      <div>
        <label for="email" class="block mb-2 text-sm font-medium text-gray-300">Username</label>
        <input type="text" v-model="username" class="bg-gray-50 border border-gray-300 text-gray-900 text-sm rounded-lg focus:ring-blue-500
          focus:border-blue-500 block w-full p-2.5 " placeholder="Enter username" required />
      </div>
      <div class="flex items-start">
        <button type="submit" class="w-full rounded-md p-2 text-white bg-blue-400 hover:bg-blue-500">
          <span class="material-icons">login</span>
        </button>
      </div>
    </form>
    <p class="text-sm my-2">For testing purposes type - webinyuser </p>
  </div>
  <div v-else>
    <div class="m-2 mx-auto w-full max-w-sm bg-white rounded-lg border border-gray-200 shadow-m ">
      <div class="flex flex-col items-center pb-10">
        <span class="material-icons text-gray-900 text-5xl">person</span>
        <h5 class="mb-1 text-xl font-medium text-gray-900">{{store.user.name}}</h5>
        <span class="text-sm text-gray-500">{{store.user.username}}</span>
        <div class="flex mt-4 space-x-3 md:mt-6">
          <button @click="handleLogout"
            class="inline-flex items-center py-2 px-4 text-sm font-medium text-center text-white bg-blue-700 rounded-lg hover:bg-blue-800 focus:ring-4 focus:outline-none focus:ring-blue-300">
              Log Out
          </button>
        </div>
      </div>
    </div>
    <div v-for="item in cartStore.purchases" :key="item.id" class="p-2 shadow-md border-black border-2 m-2">
      <div v-if="item.currentUser.username===store.user.username">
        <div class="flex justify-between">
          <div>
            <span class="material-icons text-5xl">{{item.category}}</span>
            <h2 class="font-bold">{{item.title}}</h2>
          </div>
          <a :href=item.productLink target="_blank" rel="noopener noreferrer">{{item.productLink}}</a>
        </div>
      </div>
    </div>
  </div>
</template>

<script setup>
import { ref } from "vue";
import { useCartStore } from "../stores/cart";
import { useUserStore } from "../stores/users";
const store = useUserStore();
const cartStore = useCartStore();
const username = ref('')
const handleLogin = () => {
  store.login(username)
  username.value = ""
}
const handleLogout = () => {
  store.logout()
  router.push("/")
}
</script>
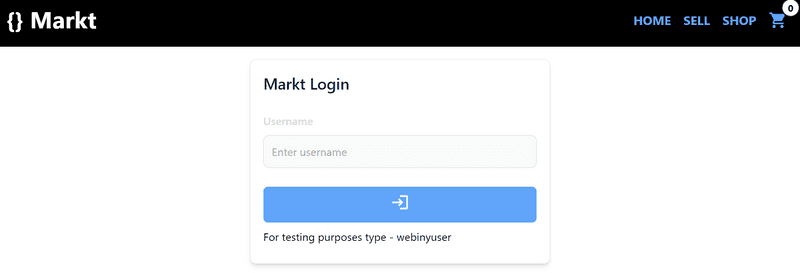
With the code above, if the user is not logged in they see a login screen:
Or else the user is logged in they see a Name, Username and "Log out" button:
Showing Products Data
Next we need to get all the data from the Product Model. We will create another store called products.js and add the GraphQL we need to list all of the products. We will add the functionality to view all the products.
query {
      listProducts {
        data {
          id
          title
          desc
          seller
          category
          productLink
          price
        }
      }
    }
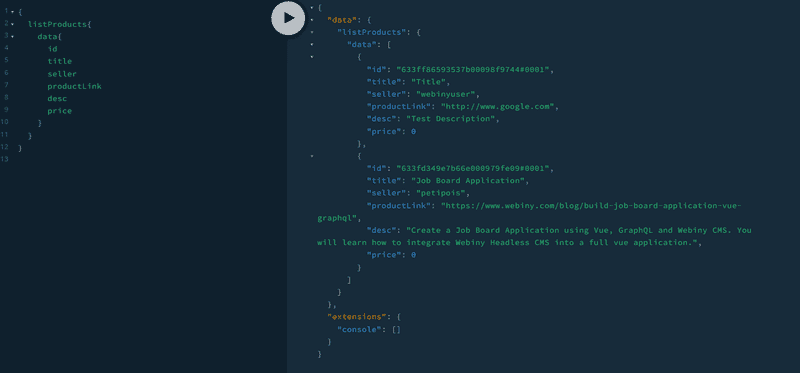
As before, run this query in the GraphQL Playground to verify we have all the data as expected:
Product Data Store
This is the products.js file with our Pinia Product Store, where we will put all the code related to our Products model. We will handle GraphQL queries and mutations here.
/** stores/products.js */
import { defineStore } from "pinia";
import { reactive, ref } from "vue";

import { useQuery, useMutation } from "@vue/apollo-composable";
import gql from "graphql-tag";

export const useProductStore = defineStore("products", () => {
  const products = reactive([]);
  let allProducts;

  const user = JSON.parse(localStorage.getItem("user"));

  const ALL_PRODUCTS_QUERY = gql`
    query {
      listProducts {
        data {
          id
          title
          desc
          seller
          category
          productLink
          price
        }
      }
    }
  `;

  const { loading, result, error } = useQuery(ALL_PRODUCTS_QUERY);
  allProducts = result;

  const updateProducts = () => {
    allProducts.value.listProducts.data.forEach((element) => {
      products.push(element);
    });
  };

  const DELETE_PRODUCT = gql`
    mutation ($id: ID!) {
      deleteProducts(revision: $id) {
        data
      }
    }
  `;

  const { mutate: deleteProduct } = useMutation(DELETE_PRODUCT, (product) => ({
    variables: {
      id: product,
    },
  }));
  const removeFromWebiny = (product) => {
    deleteProduct(product).then(() => {
      window.location.reload();
    });
  };
  return {
    result,
    updateProducts,
    allProducts,
    products,
    removeFromWebiny,
  };
});
Products View
We will add the code to view all the products and if the user is logged in they cannot buy their own items but they will be able to update or delete them.
/** views/Products.vue*/
<script setup>
import { useMutation, useQuery } from '@vue/apollo-composable'
import gql from 'graphql-tag'
import { reactive, ref } from 'vue';
import { useCartStore } from '../stores/cart';
import { useProductStore } from '../stores/products';
import { useUserStore } from '../stores/users';
let isEditing = ref(false);
const loadedProduct = reactive({})

const editProduct = (product) => {
  openEdit.value = true;
  loadedProduct.id = product.id
  loadedProduct.title = product.title
  loadedProduct.desc = product.desc;
  loadedProduct.price = product.price
  isEditing.value = true
}

const UPDATE_PRODUCT = gql`
    mutation updateProduct(
      $id: ID!
      $title: String!
      $desc: String!
      $price: Number!
    ) {
      updateProducts(
        revision: $id
        data: { title: $title, desc: $desc, price: $price }
      ) {
        data {
          title
          desc
          price
        }
      }
    }
  `;
const { mutate: updateProduct } = useMutation(UPDATE_PRODUCT, () => ({
  variables: {
    id: loadedProduct.id,
    title: loadedProduct.title,
    desc: loadedProduct.desc,
    price: loadedProduct.price,
  },
}));

const updateWebiny = () => {
  console.log(loadedProduct)
  updateProduct().then(() => {
    window.location.reload();
  });
};

const viewProduct = (product) => {
  openView.value = true;
  loadedProduct.title = product.title
  loadedProduct.desc = product.desc;
  loadedProduct.price = product.price
  loadedProduct.seller = product.seller
}
const openEdit = ref(false)
const openView = ref(false)
const store = useProductStore();
const userStore = useUserStore();
const cartStore = useCartStore();
</script>
<template>

<!-- POPUP -->
  <div v-if="openView" class="shadow-md  rounded-lg fixed top-0 right-0 left-0  w-full md:inset-1 bg-white h-1/2">
    <button
      @click="openView=false"
      class="inline-flex items-center  p-2 m-1 text-sm font-medium text-center text-white bg-blue-300 rounded-lg hover:bg-black"
    >
      <span class="material-icons">close</span>
    </button>
    <h1 class="text-3xl font-bold m-2">{{loadedProduct.title}}</h1>
    <div class="p-2">
      <p>{{loadedProduct.desc}}</p>
      <div class="flex justify-between">
        <h2 class="font-bold text-3xl">${{loadedProduct.price.toFixed(2)}}</h2>
        <div class="flex">
          <h1 class="bg-blue-100 text-blue-800 text-lg font-medium inline-flex items-center px-2.5 py-0.5 rounded">
            <span class="material-icons">account_circle</span>
            {{loadedProduct.seller}}
          </h1>
        </div>
      </div>
    </div>
  </div>
<!-- POPUP -->

  <div v-if="openEdit" class="shadow-md p-2 rounded-lg fixed top-0 right-0 left-0  w-4/4 md:inset-5 bg-white h-3/4">
    <button @click="openEdit=false" class="m-1 p-2 text-white bg-black hover:bg-blue-400 rounded-md">
      <span class="material-icons">
          close
      </span>
    </button>

    <h1 class="text-3xl font-bold m-2">Edit Product</h1>
    <form @submit.prevent="updateWebiny()" class="flex flex-col mx-auto p-2">
      <input
        type="text"
        placeholder="Title"
        v-model="loadedProduct.title"
        class="bg-gray-50 border border-gray-300 text-gray-900 text-sm rounded-lg focus:ring-blue-500 focus:border-blue-500 block w-full p-2.5"
      />
      <input
        type="number"
        placeholder="Price"
        step="0.01"
        v-model="loadedProduct.price"
        class="bg-gray-50 border border-gray-300 text-gray-900 text-sm rounded-lg focus:ring-blue-500 focus:border-blue-500 block w-full p-2.5"
      />
      <textarea
        v-model="loadedProduct.desc"
        placeholder="Description"
        name="" id=""
        cols="5"
        rows="5"
        class="bg-gray-50 border border-gray-300 text-gray-900 text-sm rounded-lg focus:ring-blue-500 focus:border-blue-500 block w-full p-2.5"
       />
      <button type="submit"
        class="items-center p-2 m-1 text-sm font-medium text-center text-white bg-blue-300 rounded-lg hover:bg-black">
        <span class="material-icons">save</span></button>
    </form>
  </div>
  <div v-if="store.result" class="flex flex-wrap m-2">
    <div class="m-1" v-for="product in store.result.listProducts.data" :key="product.title">
      <div class="m-2 mx-auto w-60 h-60 overflow-hidden max-w-sm bg-white rounded-lg border border-gray-200 shadow-md">
        <div class="flex flex-col items-center p-2 text">
          <span
            class="material-icons text-center rounded-md bg-white p-4 shadow-md text-black text-5xl">{{product.category}}</span>
        </div>
        <div class="p-2">
          <h5 class=" text-xl text-left font-medium text-gray-900">{{product.title}}</h5>
          <h5 class="text-3xl font-medium text-gray-900">${{product.price.toFixed(2)}}</h5>
          <h5 class="text-sm font-medium text-gray-900">posted by: {{product.seller}}</h5>
          <div class="flex">
            <button @click="viewProduct(product)"
              class="inline-flex items-center p-2 m-1 text-sm font-medium text-center text-white bg-blue-300 rounded-lg hover:bg-black">
              <span class="material-icons">description</span></button>
            <button @click="cartStore.addToCart(product)" v-if="product.seller!=userStore.user.username"
              class="inline-flex items-center text-sm p-2 m-1 font-medium text-center text-white bg-blue-300 rounded-lg hover:bg-black">
              <span class="material-icons">add_shopping_cart</span></button>
            <div v-else> <button @click="editProduct(product)"
                class="inline-flex items-center p-2 m-1 text-sm font-medium text-center text-white bg-blue-300 rounded-lg hover:bg-black">
                <span class="material-icons">edit</span>
              </button>
              <button @click="store.removeFromWebiny(product)"
                class="inline-flex items-center p-2 m-1 text-sm font-medium text-center text-white bg-blue-300 rounded-lg hover:bg-black">
                <span class="material-icons">delete</span>
              </button>
            </div>

          </div>
        </div>
      </div>
    </div>
  </div>
  <div v-else>
    No Products to display.
  </div>
</template>
Here's the completed product view:
The Shopping Cart
The Cart.vue file will keep track of all the items we add to our cart from the products page. We will get all the information from our cart.js Pinia Store.
<!-- views/Cart.vue  -->
<template>
    <div class="flex justify-between">
        <h3 class="p-2 text-3xl font-bold">Cart Total: {{store.cart.length}}</h3>
        <h3 class="p-2 text-3xl font-bold">{{store.total.toFixed(2)}}</h3>
    </div>
    <div v-for="item in store.cart" :key="item.id" class="p-2 shadow-md border-black border-2 m-2">
        <div class="flex justify-between">
            <div>
                <span class="material-icons text-5xl">{{item.category}}</span>
                <h2 class="font-bold">{{item.title}} - {{item.price}}</h2>
            </div>
            <button class="text-blue-400 p-2 rounded-sm" @click="store.savePurchases(item)">
              <span class="material-icons p-2 text-center">
                  money
              </span>
            </button>
            <button class="text-blue-400 p-2 rounded-sm" @click="store.removeFromCart(item.id)">
              <span class="material-icons p-2 text-center">
                    remove_circle
                </span>
              </button>
        </div>
    </div>
</template>

<script setup>
import { useCartStore } from '../stores/cart';

const store = useCartStore();

</script>
Here's the finished cart:
Creating a Product
This is where we will add a new product to the Webiny CMS using a GraphQL mutation. Here is the full mutation:
mutation createProducts(
  $seller: String!
  $title: String!
  $desc: String!
  $price: Number!
  $category: String!
  $link: String!
) {
  createProducts(
    data: {
      title: $title
      desc: $desc
      price: $price
      productLink: $link
      seller: $seller
      category: $category
    }
  ) {
    data {
      title
      desc
      price
      productLink
      seller
      category
    }
  }
}
As a standard practice we will test the mutation on the Webiny API Playground shown below:
This is the GraphQL syntax we will use to create a new project. We will also make a query on our Categories Model so that we can use the results as option in our form.
query {
  listCategories {
    data {
      id
      title
      iconName
    }
  }
}
You should see results similar to this:
Creating New Products
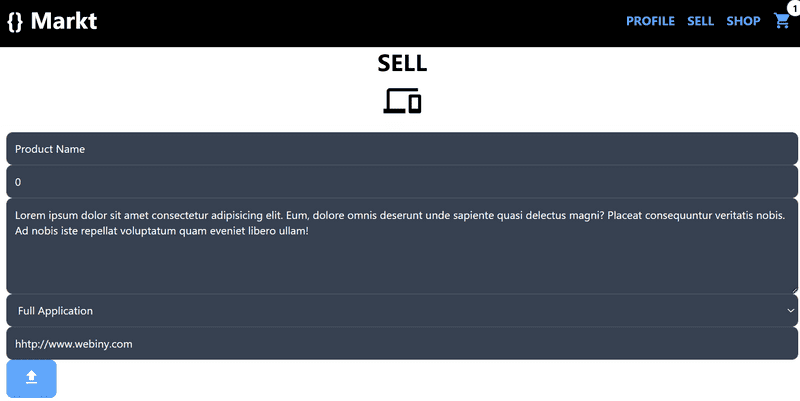
Now that we have successfully tested our GraphQL queries and mutations we will implement the GraphQL mutation for create new products. The code below is the entire syntax for the Create.vue file:
<script setup>
import { useMutation, useQuery } from '@vue/apollo-composable';
import { useUserStore } from "../stores/users";

import gql from 'graphql-tag';
import { reactive, ref } from 'vue';
import router from '../router';
const store = useUserStore();
const product = ref({
  title: 'Product Name',
  price: 0.00,
  desc: 'Lorem ipsum dolor sit amet consectetur adipisicing elit. Eum, dolore omnis deserunt unde sapiente quasi delectus magni? Placeat consequuntur veritatis nobis. Ad nobis iste repellat voluptatum quam eveniet libero ullam!',
  link: "https://www.webiny.com"
})
const category = ref('article')
const categories = reactive([])
const GET_CATEGORIES = gql`
query {
  listCategories
  {
    data{
      id
      title
      iconName
    }
  }
}`

const { result, error } = useQuery(GET_CATEGORIES);
if (result) {
  categories.push(result)
} else {
  console.log("No Categoies")
}
const ADD_PRODUCT_MUTATION = gql`
mutation createProducts(
  $seller: String!
  $title: String!
  $desc: String!
  $price: Number!
  $category: String!
  $link: String!
) {
  createProducts(
    data: {
      title: $title
      desc: $desc
      price: $price
      productLink: $link
      seller: $seller
      category: $category
    }
  ) {
    data {
      title
      desc
      price
      productLink
      seller
      category
    }
  }
}

`
const { mutate: createProducts } = useMutation(ADD_PRODUCT_MUTATION, () => ({
  variables: {
    title: product.value.title,
    desc: product.value.desc,
    category: category.value,
    price: product.value.price,
    link: product.value.link,
    seller: store.user.username
  },
}))
function uploadProduct() {
  createProducts().then(() => {
    console.log(product.value)
    alert("You have successfully added a new product")
    router.push("/products")
  })
}

</script>

<template>
  <h2 class="text-3xl font-bold text-center uppercase">Sell</h2>
  <span class="material-icons text-5xl p-2 text-center">
    {{category}}
  </span>
  <form @submit.prevent="uploadProduct" class=" mx-auto p-2 w-full shadow-md">
    <input
      type="text"
      placeholder="Title"
      v-model="product.title"
      class="bg-gray-50 border border-gray-300 text-gray-900 text-sm rounded-lg focus:ring-blue-500 focus:border-blue-500 block w-full p-2.5"
    />
    <input
      type="number"
      placeholder="Price"
      step="0.01"
      v-model="product.price"
      class="bg-gray-50 border border-gray-300 text-gray-900 text-sm rounded-lg focus:ring-blue-500 focus:border-blue-500 block w-full p-2.5"
    />
    <textarea
      v-model="product.desc"
      placeholder="Description"
      name=""
      id=""
      cols="5"
      rows="5"
    />
      class="bg-gray-50 border border-gray-300 text-gray-900 text-sm rounded-lg focus:ring-blue-500 focus:border-blue-500 block w-full p-2.5"
    <select
      name=""
      id=""
      v-model="category"
      v-if="result"
      class="bg-gray-50 border border-gray-300 text-gray-900 text-sm rounded-lg focus:ring-blue-500 focus:border-blue-500 block w-full p-2.5"
    >
      <option :value="cat.iconName" v-for="cat in result.listCategories.data" :key="cat.id">
        {{cat.title}}
      </option>
    </select>
    <input
      type="text"
      placeholder="URL link to Product"
      v-model="product.link"
      class="bg-gray-50 border border-gray-300 text-gray-900 text-sm rounded-lg focus:ring-blue-500 focus:border-blue-500 block w-full p-2.5"
    />
    <button
      type="submit"
      class="text-white bg-blue-400 hover:bg-black font-medium rounded-lg text-sm  sm:w-auto px-5 py-2.5 text-center w-full">
        <span class="material-icons">upload</span></button>
  </form>
</template>
Now you should be able to view a single product as below:
In the next step we will create functions and UI elements to allow users to manage their products.
Managing Products
The application is created so that only the seller who uploaded the product can manage it. If they did not then the can only purchase the item. The following code is already inside the products.js and the Products.vue file, however I wanted to explicitly extract the functions here.
Deleting Products
In order to delete a product from the CMS we need to pass the product's id as shown below:
  const DELETE_PRODUCT = gql`
    mutation ($id: ID!) {
      deleteProducts(revision: $id) {
        data
      }
    }
  `;

  const { mutate: deleteProduct } = useMutation(DELETE_PRODUCT, (product) => ({
    variables: {
      id: product,
    },
  }));
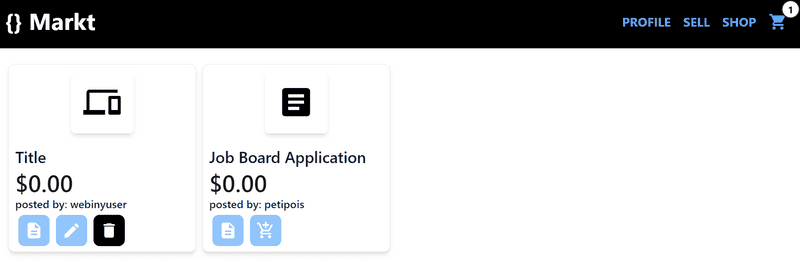
Here is the shop page with the ability to manage a product:
Update a Product
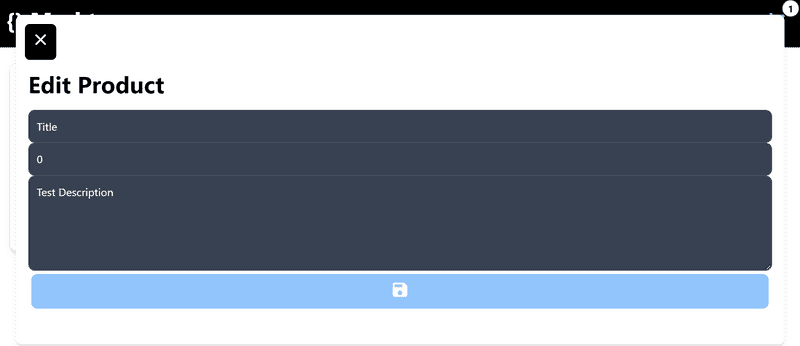
The application only allows the seller to update the title, description and the price. So in our GraphQL mutation we will only capture those and mutate them.
 mutation updateProduct(
      $id: ID!
      $title: String!
      $desc: String!
      $price: Number!
    ) {
      updateProducts(
        revision: $id
        data: { title: $title, desc: $desc, price: $price }
      ) {
        data {
          title
          desc
          price
        }
      }
    }
UI for editing a product:
Now we have all of the functionality needed to create, update and delete products, we can create a header to tie the application together and allow users to navigate.
Creating a Persistent Header
All the pages are ready to be viewed in our Application so let’s create a Header that will be a component on every page. Under components create a new file called Header.vue and add the following code:
<template>
    <header class="bg-black p-2 flex flex-wrap justify-between">
        <h1 class="font-bold text-3xl text-white">{} Markt </h1>
        <ul class="flex font-bold">
            <router-link
              to="/"
              class="p-2 text-blue-400 uppercase hover:text-white"
              active-class="text-white"
            >
                {{userStore.user.username ? "Profile":"Home" }}
            </router-link>
            <router-link
              to="/new"
              class="p-2 text-blue-400 uppercase hover:text-white"
              active-class="text-white"
            >
                Sell
            </router-link>
            <router-link
              to="/products"
              class="p-2 text-blue-400 uppercase hover:text-white"
              active-class="text-white"
            >
                Shop
            </router-link>
            <router-link
              to="/cart"
              class="p-2 text-blue-400 hover:text-white uppercase"
              active-class="text-white"
            >
                <span class="material-icons">
                    shopping_cart
                </span>
                <span class="inline-flex absolute -top-0 -right-0 justify-center items-center w-6 h-6 text-xs font-bold text-black bg-white rounded-full border-2 border-white text-center">
                    {{cartStore.cart.length}}
                </span>
            </router-link>
        </ul>
    </header>
</template>

<script setup>
import router from "../router";
import { useUserStore } from "../stores/users";
import { useCartStore } from "../stores/cart";
const userStore = useUserStore();
const cartStore = useCartStore();
</script>
Now in our App.vue file we can add the header on every page by placing it above our router-view write the following code:
<script setup>

import { onBeforeMount } from "@vue/runtime-core";

import Header from './components/Header.vue';
import { useProductStore } from "./stores/products";

import { useUserStore } from "./stores/users";
const products = useProductStore();
const store = useUserStore();
onBeforeMount(() => {
  store.loadSellers()
})
</script>

<template>
  <div class="flex flex-col min-h-screen">
    <Header />
    <router-view></router-view>
    <div class="flex-1"></div>
  </div>

</template>
Conclusion
We have successfully created a Marketplace Application where a user can Login, Manage and Purchase products. We learned how to integrate the Webiny CMS into our Vue.js Application using Vue Apollo along with the state management library Pinia.
Full source code: https://github.com/webiny/write-with-webiny/tree/main/tutorials/vue-marketplace
This article was written by a contributor to the Write with Webiny program. Would you like to write a technical article like this and get paid to do so? Check out the Write with Webiny GitHub repo.


