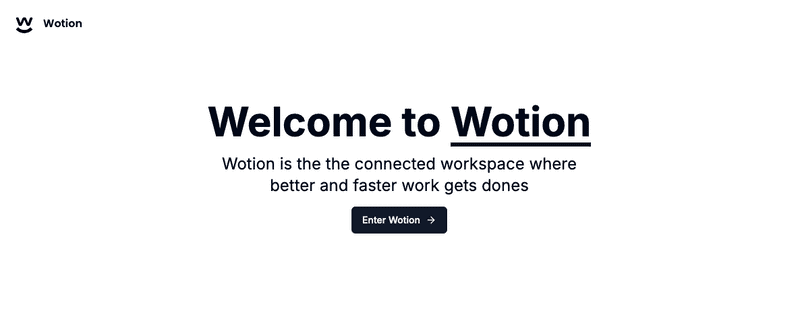
Great, we're all set with the Webiny setup. Now, let's start building the frontend of our Notion Clone using Next.js. In this section, we will set up the Next.js app and build the Home Page. The Home Page will look something like this:
Setup Next.js App
Let's create the Next.js app using the following command:
npx create-next-app@latest wotion --ts --eslint --tailwind --no-src-dir --app --import-alias "@/*"
This command includes several arguments to set up a new project non-interactively.
Add shadcn UI Library to the Project
We'll be using shadcn/ui for our UI components. Let's add it to our Next.js project.
First, navigate to the project root:
cd wotion
Then, initialize the shadcn/ui library with the following command:
npx shadcn-ui@latest init
When prompted, select all the default options.
npx shadcn-ui init -y
Need to install the following packages:
shadcn-ui@0.8.0
Ok to proceed? (y) y

✔ Which style would you like to use? › Default
✔ Which color would you like to use as base color? › Slate
✔ Would you like to use CSS variables for colors? … no / yes

✔ Writing components.json...
✔ Initializing project...
✔ Installing dependencies...

Success! Project initialization completed. You may now add components.
Once this command is successful, we’ll add all the components needed for this application.
We will need the following Shadcn components, so let’s add them to our project.
npx shadcn-ui@latest add avatar button dropdown-menu input popover skeleton
Project Structure Setup
Let's create a home page for our Wotion app and reorganize some directories according to Next.js best practices.
- Create a
(marketing)folder within theappdirectory. - Move the
app/pages.tsxfile into the(marketing)directory. - Replace the content of the
(marketing)/page.tsxfile with the following:
export default function Home() {
  return (
      <div>Welcome to Wotion!</div>
  );
}
Update the app's metadata by replacing the content in app/layout.tsx with the following:
export const metadata: Metadata = {
  title: "Wotion",
  description:
      "The connected workspace where better and faster work gets done."
};
Now, run the project to ensure everything is working as expected.
npm run dev
Once the app is ready, you will see a screen displaying the message:
Welcome to Wotion!
Home Page Setup
Header
- In the
(marketing)directory, create a_componentsfolder. - Inside the
_componentsfolder, create a new file namedheading.tsx.
"use client";
import { Button } from "@/components/ui/button";
import { ArrowRight } from "lucide-react";

export const Heading = () => {
    return (
        <div className="max-w-3xl space-y-4">
            <h1 className="text-3xl sm:text-5xl md:text-6xl font-bold"> Welcome to <span className="underline">Wotion</span>{" "} </h1>
            <h3 className="text-base sm:text-xl md:text-2xl">
                Wotion is the the connected workspace where <br /> better and faster work gets dones </h3>
            <Button> Enter Wotion <ArrowRight className="h-4 w-4 ml-2" /> </Button>
        </div>
    );
};
Logo
Download the logo from here and place it in the public directory.
Next, create a logo.tsx file in the _components directory with the following content:
import Image from "next/image";
import { Poppins } from "next/font/google";

import { cn } from "@/lib/utils";

const font = Poppins({
    subsets: ["latin"], weight: ["400", "600"],
});

export const Logo = () => {
    return (
        <div className="hidden md:flex items-center gap-x-2">
            <Image src="/logo.svg" height="40" width="40" alt="logo" />
            <p className={cn("font-semibold", font.className)}>Wotion</p>
        </div>
    );
};
Navigation Bar
Next, we will create a fixed navigation bar for the public page.
To make the navigation bar fixed and add a bottom border when the page is scrolled, we'll create a custom hook.
- In the root directory of your project (
wotion), create a new folder namedhooks. - Inside the
hooksfolder, create a file nameduse-scroll-top.tsxwith the following content:
import { useState, useEffect } from "react";

export const useScrollTop = (threshold = 10) => {

    const [scrolled, setScrolled] = useState(false);
    useEffect(() => {
        const handleScroll = () => {
            if (window.scrollY > threshold) { setScrolled(true);
            }else {
                setScrolled(false);
            }
        };
        window.addEventListener("scroll", handleScroll);
        return () => window.removeEventListener("scroll", handleScroll); },
        [threshold]
    );

return scrolled;
};
Now, create a navbar.tsx file in the (marketing)/_components directory.
"use client";

import { useScrollTop } from "@/hooks/use-scroll-top";
import { cn } from "@/lib/utils";
import { Logo } from "./logo";

export const Navbar = () => { const scrolled = useScrollTop();
    return ( <div className={cn( "z-50 bg-background fixed top-0 felx items-center w-full p-6", scrolled && "border-b shadow-sm" )} > <Logo /> </div> ); };
Now, update the (marketing)/page.tsx file with the following content:
import { Heading } from "./_components/heading";

const MarketingPage = () => {
  return (
      <div className="min-h-screen flex flex-col">
        <div className="flex flex-col items-center justify-center md:justify-start text-center gap-y-8 px-6 pb-10 flex-1">
          <Heading />
        </div>
      </div>
  );
};

export default MarketingPage;
Now, let's create a layout for the home page, designed as a marketing page.
Create a layout.tsx file in the (marketing) directory.
import { Navbar } from "./_components/navbar";

const MarketingLayout = ({ children }: { children: React.ReactNode }) => {
  return (
    <div className="min-h-full">
      <Navbar />
      <main className="min-h-full pt-40">{children}</main>
    </div>
  );
};

export default MarketingLayout;
Now, when you run the app using the npm run dev command, you should see the Navbar and Heading displayed on the Home Page.
Next Step! Part 3 - Sign Up & Login With Amplify UI
Our Next.js application is ready, so next we can proceed to implement the Sign Up and Login functionality using Amplify UI.
If you have any questions or feedback related to this tutorial, please feel free to reach out to us on the Community Slack!
This article was written by a contributor to the Write with Webiny program. Would you like to write a technical article like this and get paid to do so? Check out the Write with Webiny GitHub repo.


