Are you interested in learning how to set up a blog site? Look no further! We'll guide you through a detailed process on how to build a blog site with Webiny Headless CMS and Scully, a static site generator for Angular. This includes rendering static content, such as HTML, CSS, and Javascript, from Angular templates so you can host your website on Netlify, Vercel, or any other infrastructure of your choice.
What Is Scully?
Scully is an excellent static site generator for Angular projects. It analyzes the route structure of your Angular application to create a list of routes, and then generates an index.html for each of them. This approach allows your application to show up instantly for the user. Scully is essentially a Jamstack solution for Angular developers. Jamstack stands for JavaScript/API/Markup, and Scully.io is one of the vendors outside of the popular NextJS and Gatsby frameworks.
Scully offers an easy-to-use and extensible plugin system that allows custom routes and content manipulation. Additionally, it helps make your blog application very SEO-friendly.
What Is a Headless CMS?
A headless CMS is a back-end-only content management site that acts primarily as a content repository. It can deploy content across any front-end or device via APIs. This is key to omnichannel strategies because it allows you to integrate content into any system, software, or website just by calling the APIs the headless CMS exposes.
Why Use Webiny CMS?
Webiny is an open-source serverless CMS built with cutting-edge tools and technologies. It also allows you to interface with other technologies such as Angular and Scully via the Content Delivery API. Webiny CMS enables users to construct websites and web apps in both large and small projects without effort by providing all of the necessary tools, all of which are tuned to function together.
Webiny CMS is perfect for creating a site that is completely responsive to mobile devices and allows for faster web development.
Prerequisites
To follow along with this tutorial, we’re going to assume you have already done the following:
- Set up your AWS credentials locally
- Ensure that you have Node.js >= 14.15.0 installed.
- Ensure that you have yarn ^1.22.0 || >=2 installed - Webiny works with both yarn versions.
- Basic understanding of Scully and Javascript.
- For Angular 9, 10, and 11, use Scully v1.1.1 and for Angular 12 and above, use Scully from v2.0.0 onward.
- Star our GitHub Repo! 😉
Set Up a Webiny Project
To create a Webiny project, you need an AWS account and Node.js installed on your system.
Go to the directory where you want to set up your project, open the terminal, and type in the command:
npx create-webiny-project [your project name]
And run the following command to deploy the project:
yarn webiny deploy
After the deployment is complete, you will be presented with the URL for your Webiny project, where you can enter the Admin Dashboard and begin developing the project's backend.
You can find out all the relevant URLs at any time by running the following command inside the Webiny project directory:
yarn webiny info
Also, the in-depth guide on Webiny installtion can be found here.
Once installation and deployment are done, you can access Admin and start managing and modeling your CMS content models immediately.
Create Content Model
Now, let’s create our blog model. To create content models, click on New content model under Headless CMS app.
We are going to name our model Article Post, add some description and click on create. Then we can access the model by clicking on Article Post from the side menu.
Our generated content model will look something like:
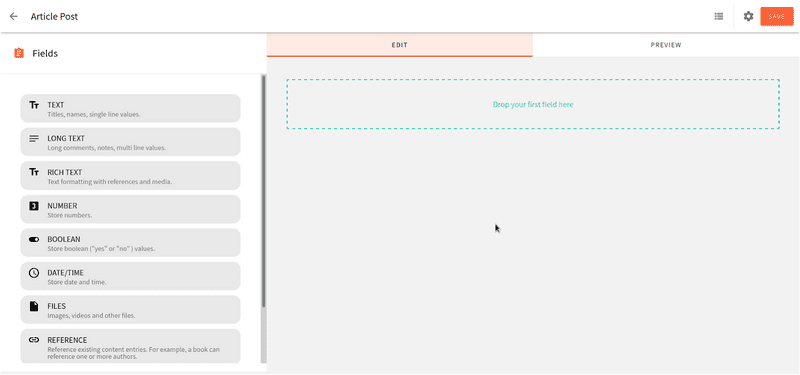
Let’s add fields to our model as shown:
- Image -
Filetype - Title -
Texttype - Body -
Rich Texttype
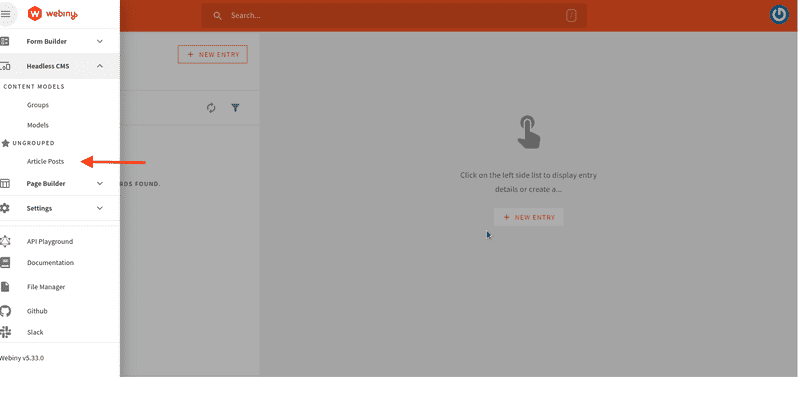
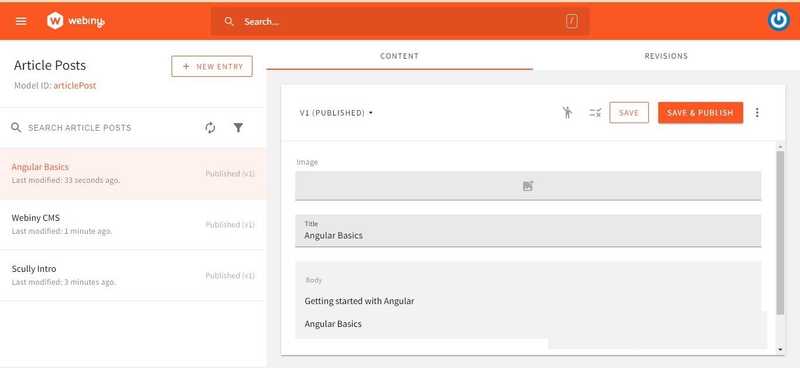
Now it’s time to create the actual content Navigate to Headless CMS > Ungrouped > Article Post, and create individual articles. Feel free to unleash your creativity.
Once you are happy with the post, click on the Save and Publish button to publish.
Now that we are done with creating models so that we can modify our articles, we can move on to the remaining part of our blog.
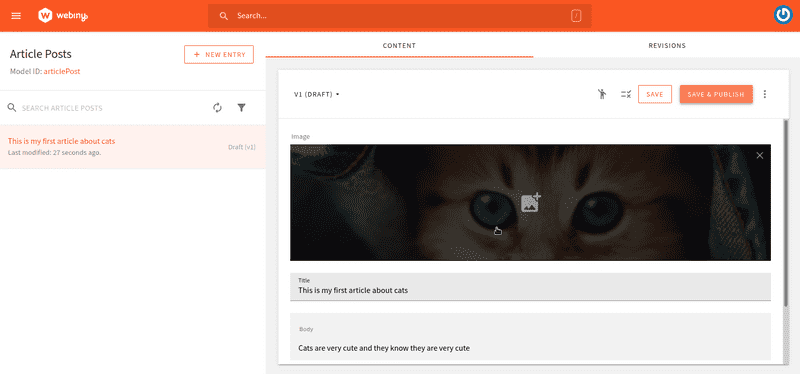
Once you create multiple blogs (content entries), it will look something like this:
Building a Blog Site With Scully
We'll be using Scully, to build out the front-end part of our blog application. Scully is a static site generator that provides a schematic that enables Angular applications to use markdown files for your blog's content. Here, we will add a home page to list all the articles and an article detail page.
Installing Dependencies
Install Angular CLI. You can install CLI globally with following command:
npm install –g @angular/cli
To create a new angular project run the CLI command ng new and provide the name of your app blog-app, as shown below:
ng new blog-app
Go the src/app.component.html and replace the content with
<router-outlet></router-outlet>
We are going to use Materialize for styling purposes, so open the index.html file and add the following:
<link rel="stylesheet" href="https://cdnjs.cloudflare.com/ajax/libs/materialize/1.0.0/css/materialize.min.css">
Connecting the Angular Application to Webiny CMS
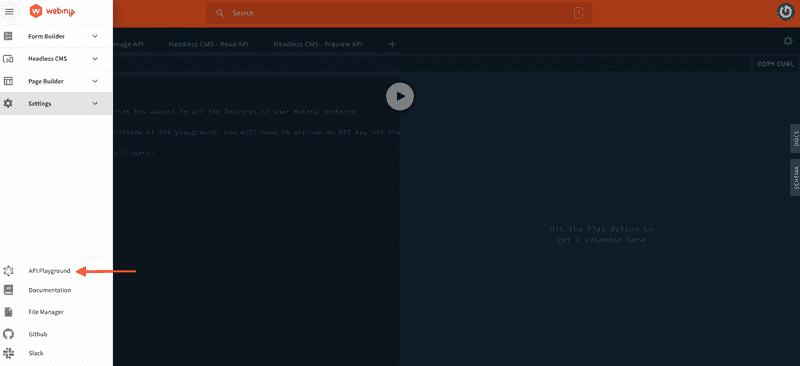
To connect the Webiny CMS to our application, we will first access GraphQL API playground.
Navigate to API Key under Headless CMS to access the token. In the headless CMS, grant custom access to read as shown below:
Create a new API key and copy the actual token and save it.
Create a .env file at the base of your project and add the below code.
CMS_BASE_URL=https://your-webiny-base-url
GRAPHQL_API_URL=https://yourgrapgql-url/graphql
GRAPHQL_API_TOKEN=your-api-token
We will first access our schema.json file to define our interface such as:
export interface ArticlePost{
  id: string;
  title: string;
  image: string;
  description: string;
}
Create an authentication folder and name the file webiny.config.ts
importimport { Injectable } from '@angular/core';
import { environment } from 'src/environments/environment';

@Injectable()
export class WebinyConfig {
    constructor(
        public readonly url: string,
        public readonly APP_NAME: string,
        public readonly GRAPHQL_API_URL: string,
        public readonly GRAPHQL_API_TOKEN: string
    ) {
    }

    public buildUrl(url: string) {
        if (url.length > 0 && url.startsWith('/')) {
            url = url.substr(1);
        }

        const result = `${this.url}/${url}`.replace('{app}', this.APP_NAME);

        return result;
    }
}

export const DefaultWebinyConfig = new WebinyConfig(
    'CMS_BASE_URL',
    `${environment.webiny.APP_NAME}`,
    `${environment.webiny.GRAPHQL_API_URL}`,
    `${environment.webiny.GRAPHQL_API_TOKEN}`
);
Next, we need an interceptor to authenticate our backend. So add the following content to the interceptor file (post-auth.interceptor.ts).
import { Injectable } from '@angular/core';
import {
  HttpRequest,
  HttpHandler,
  HttpEvent,
  HttpInterceptor,
  HttpErrorResponse,
  HttpHeaders,
  HttpResponse
} from '@angular/common/http';
import { Observable, of, throwError } from 'rxjs';
import { catchError, filter, map, switchMap } from 'rxjs/operators';
import { WebinyConfig } from './webiny.config';

@Injectable()
export class ContentAuthInterceptor implements HttpInterceptor {

  constructor( private readonly config: WebinyConfig) {}

  intercept(request: HttpRequest<unknown>, next: HttpHandler): Observable<HttpEvent<unknown>> {

    if(request.url.includes('webiny')){
      return this.invokeInternal(request, next, true);
    }else{
      return next.handle(request);
    }
  }

  private invokeInternal(req: HttpRequest<any>, next: HttpHandler, retry: boolean): Observable<HttpEvent<any>> {
    return this.getToken(next).pipe(
        switchMap(token => {
            req = req.clone({
                setHeaders: {
                    Authorization: `Bearer ${token}`
                }
            });

            return next.handle(req).pipe(
                catchError((error: HttpErrorResponse) => {
                    if ((error.status === 403 || error.status === 401) && retry) {
                        clearBearerToken();

                        return this.invokeInternal(req, next, false);
                    } else {
                        return throwError(error);
                    }
                })
            );
        })
    );
  }
  private getToken(next: HttpHandler) {
    // Check if we have already a bearer token in local store.
    const cachedToken = getBearerToken();

    if (cachedToken) {
        return of(cachedToken);
    }

    // tslint:disable-next-line: max-line-length
    const body = `token_key=${this.config.GRAPHQL_API_URL}`;

    const tokenRequest = new HttpRequest('POST', this.config.buildUrl('identity-server/connect/token'), body, {
        responseType: 'json',
        headers: new HttpHeaders({
            'Content-Type': 'application/x-www-form-urlencoded'
        })
    });

    return next.handle(tokenRequest).pipe(
      filter (x => x instanceof HttpResponse),
      map((response: HttpResponse<any>) => {
      const token = response.body.access_token;

      // Cache the bearer token in the local store.
      setBearerToken(token);
      return token;
    }));
  }
}

function getBearerToken() {
  return localStorage.getItem('token');
}

function setBearerToken(token: string) {
  localStorage.setItem('token', token);
}

function clearBearerToken() {
  localStorage.removeItem('token');
}
Let’s add apollo-angular to our app to fetch our data from the graphql api. Then add this to configure the api url and token key in our app.
ng add apollo-angular
In graphql module.ts, replace uri variable with the following:
const uri = environment.webiny.GRAPHQLAPI;
Also, add the access token as follows:
const authLink = setContext((_, { headers }) => {
  const token = localStorage.getItem(environment.webiny.GRAPHQLTOKEN);
  return {
    headers: {
      ...headers,
      authorization: token ? `Bearer ${token}` : "",
    },
  };
});
The graphql module.ts file will look like this:
import {NgModule} from '@angular/core';
import {ApolloModule, APOLLO_OPTIONS} from 'apollo-angular';
//import { ApolloClient } from 'apollo-client';
import {ApolloClientOptions, ApolloLink, InMemoryCache} from '@apollo/client/core';
import {HttpLink} from 'apollo-angular/http';
import { HttpClient, HttpClientModule, HttpHeaders } from '@angular/common/http';
import { onError } from "@apollo/client/link/error";
import { setContext } from "@apollo/client/link/context";
import { environment } from 'src/environments/environment';

const uri = 'https://d2ldhnat8tybyp.cloudfront.net/graphql'; // <-- add the URL of the GraphQL server here

export function createApollo(httpLink: HttpLink): ApolloClientOptions<any> {

  const basic = setContext(() => ({
    headers: new HttpHeaders()
      .set('Accept', 'charset=uf-8'),
  }));

  const auth = setContext((operation: any, ctx: { headers: { append: (arg0: string, arg1: string) => any; }; }) => ({
    headers: ctx.headers.append('Authorization', `${environment.webiny.GRAPHQL_API_TOKEN}`)
  }));

  const link = ApolloLink.from([basic, auth, httpLink.create({ uri })]);
  const cache = new InMemoryCache();

  return {
    link,
    cache: new InMemoryCache()
  }
}

@NgModule({
  exports: [
    HttpClientModule,
    ApolloModule,
  ],
  providers: [{
    provide: APOLLO_OPTIONS,
    useFactory: createApollo,
    deps: [HttpLink, HttpClient],
  }],
})

export class GraphQLModule {}
Before we get started on creating components, we will first access our data. We will use the generate a service that will call our api to access our posts data.
Create a service (Content.service.ts) to access data:
ng g s content
import { Injectable } from '@angular/core';
import { ApolloQueryResult } from '@apollo/client';
import { isScullyGenerated,  TransferStateService  } from '@scullyio/ng-lib';
import { gql, Apollo } from 'apollo-angular';
import { map, Observable, tap } from 'rxjs';
import { ArticlePost } from '../models/post';

const Get_Posts = gql`
query Data {
    listArticlePosts {
      data {
        id
        title
        image
        description
      }
  }
}
`;

@Injectable({
  providedIn: 'root'
})
export class PostService {

  constructor(private apollo: Apollo, private transferStateService: TransferStateService){ }

  getPosts(): Observable<any> {
    return this.apollo.watchQuery<any>({
      query: Get_Posts
    }).valueChanges.pipe(map((result) => result.data));

  }
  getContentBySlug(slug: string): Observable<any> {
    return this.apollo.watchQuery<any>({
      query: Get_Posts
    }).valueChanges.pipe(
      map((data: any) =>
        data.items.find((item: ArticlePost) => item.slug === slug)
      )
    );
  }

  title = 'blog-app';

}
Creating a List Article Page
The first component that we are going to create is list module that will contain all the blog post links. Add a home component.
ng g list
Generate a home component:
ng g m home
In the app-routing.module.ts, configure the routes:
const routes: Routes = [{
  path: '',
  component: HomeComponent,
  path: '',
  component: ListComponent,
}];
We can inject our service in the home component to load our data
Open list.component.ts and update it with following content:
import { Component, OnInit } from '@angular/core';
import { Observable } from 'rxjs';
import { PostService } from 'src/app/services/post.service';
import { ArticlePost } from 'src/app/models/post';

@Component({
  selector: 'app-list',
  templateUrl: './list.component.html',
  styleUrls: ['./list.component.scss']
})
export class ListComponent implements OnInit {
  posts!: Observable<ArticlePost[]>;

  constructor(private postService: PostService) {

  }

    ngOnInit() {
      this.posts = this.postService.getPosts();

  }
}
Then add this in our home template (list.component.html):
<div class="intro">
  <h3>Scully Webiny Blog</h3>
  <span>A simple blog built with Scully and Webiny</span>
</div>
<p>Recent Posts</p>
<div class="post-wrapper">
  <div class="post" *ngFor="let post of (posts | async)">
    <h1>{{ post.title }}</h1>
    <small>Date:{{ post.createdOn}}</small>
    <a [routerLink]="['/blog' + post.id]"><button class="submit-btn">Read article</button></a>
  </div>
</div>
Creating a Single List Post
We need to read the id from the URL and display the correct article in the Angular post component. It should import the ActivatedRoute and ArticleService modules and uses the ngOnInit() method to subscribe to route parameters and retrieve the article details from the ArticleService. First, we are going to create a Post component:
ng g c Post
Add following content to (post.component.html) file:
<h1 [innerHTML]="title"></h1>
<div [innerHTML]="body"></div>
Add following content to (post.component.ts) file:
import { Component, OnInit } from '@angular/core';
import { ActivatedRoute } from '@angular/router';
import { ArticlePost } from 'src/app/models/post';
import { PostService } from 'src/app/services/post.service';

@Component({
  selector: 'app-blog-post',
  templateUrl: './blog-post.component.html',
  styleUrls: ['./blog-post.component.scss']
})
export class BlogPostComponent implements OnInit {

  postId:string | null;
  title: string | null;
  body: string | null;

  constructor(private postService: PostService,
    private route: ActivatedRoute) {

      this.postId = this.route.snapshot.paramMap.get("postId");
      this.title = null;
      this.body = null;
    }

  ngOnInit(): void {
    const postId: string = this.postId ?? '';

    this.postService.getContentById(postId).subscribe(
      result => {
        const post:ArticlePost = result;
        this.title = post.title;
        this.body = post.data.text;

      }
    );
  }

}
Ensure the routes are configured correctly in the app-routing module.ts
import { NgModule } from '@angular/core';
import { RouterModule, Routes } from '@angular/router';
import { BlogPostComponent } from './components/blog-post/blog-post.component';
import { ListComponent } from './components/list/list.component';

const routes: Routes = [
  {path: 'blog/:postId', component: BlogPostComponent},
  {path: '', component: ListComponent},
];

@NgModule({
  imports: [RouterModule.forRoot(routes)],
  exports: [RouterModule]
})
export class AppRoutingModule { }
Now, let’s add Scully to our project. We're going to use Scully to make it into a static site. It'll still have some JavaScript, but it won't be a SPA. Each route will have a "physical" Html file, that does not need to be rendered at run time.
ng add @scullyio/init --project="your-project-name"
The above command creates a Scully config file named Scully.<projectName>.config.ts, scully.blog-app.config.ts where the projectName is the name of your Angular project.
import { ScullyConfig } from '@scullyio/Scully;

export const config: ScullyConfig = {
    projectRoot: './src',
    projectName: 'blog-app',
    outDir: './dist/static',
    routes: {},
};
You may have noticed that Scully module has been added to our app component
import { ScullyLibModule } from '@scullyio/ng-lib';

@NgModule({
  // ...
  imports: [
    // ...
    ScullyLibModule
  ]
})
export class AppModule { }
Modify plugin in Scully to fetch our data. First, copy the default plugin and edit it as follows:
You can create a new router plugin name it articleServicePlugin.js in the plugins folder.
import {
  ApolloClient,
  ApolloLink,
  concat,
  gql,
  HttpLink,
  InMemoryCache,
} from '@apollo/client/core';
import fetch from 'node-fetch';
import { HandledRoute, registerPlugin } from '@scullyio/scully';
import { environment } from '../../src/environments/environment';

const authMiddleware = new ApolloLink((operation, forward) => {
  // add the authorization to the headers
  operation.setContext({
    headers: {
      authorization: `Bearer ${environment.webiny.GRAPHQL_API_TOKEN}`,
    },
  });
  return forward(operation);
});
const client = new ApolloClient({
  link: concat(
    authMiddleware,
    new HttpLink({
      uri: environment.webiny.GRAPHQL_API_URL,
      fetch,
    })
  ),
  cache: new InMemoryCache(),
});
registerPlugin(
  'router',
  'articlePostPlugin',
  async (route: string, config = {}): Promise<HandledRoute[]> => {
    const {
      data: { listArticlePosts },
    } = await client.query({
      query: gql`
        query Data {
          listArticlePosts {
            data{
              id
              title

            }

          }
        }
      `,
    });
    return Promise.resolve(
      listArticlePosts.map((post) => ({ route: `/blog/${post.id}` }))
    );
  }
);
Depending on where you acquire the data from, there are many ways to construct routes for Scully. Here, we're using a Headless CMS and a graphql API to obtain the data. As a result, we are making a GraphQL query to get a list of article posts which includes their IDs and titles. Then maps the posts to the route and returns an array of HandledRoutes.
Here is how to configure this in scully.config.ts
import { ScullyConfig } from '@scullyio/scully';
import './scully/plugins/articlePostPlugin';

/** this loads the default render plugin, remove when switching to something else. */
import '@scullyio/scully-plugin-puppeteer'

export const config: ScullyConfig = {
  projectRoot: "./src",
  projectName: "blog-app",
  // add spsModulePath when using de Scully Platform Server,
  outDir: './dist/static',

  routes: {
    '/blog/:postId': {
      type: 'articlePostPlugin'
    }
  }
};
To view our site, execute this command in your terminal.
npm run build && npm run scully
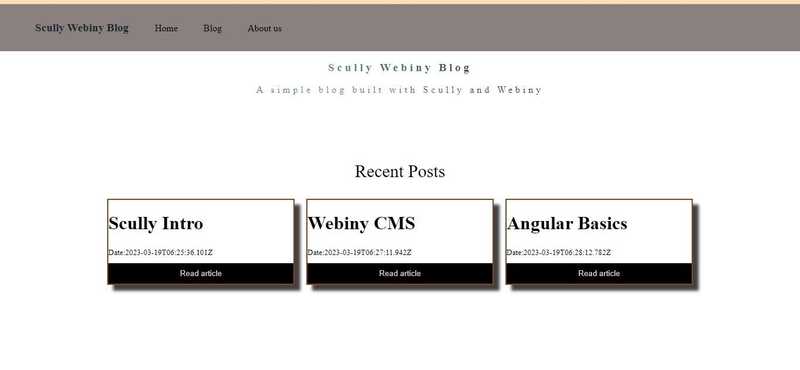
This is the final site that will be rendered after hosting our app locally, there is a home page and individual articles.
Run the code below in your terminal:
npm run scully:serve
Conclusion
In this article, we have discussed the step-by-step process of building a small blog using Scully and fetching data from Webiny Headless CMS. We covered important topics such as setting up the content structure, creating, updating, and deleting articles, as well as building a comprehensive list of articles and single article pages. By following this guide, readers can learn how to efficiently create a fully functional blog that showcases their content in an organized and visually appealing manner.
Full source code: https://github.com/webiny/write-with-webiny/tree/main/tutorials/scully-webiny-blog
This article was written by a contributor to the Write with Webiny program. Would you like to write a technical article like this and get paid to do so? Check out the Write with Webiny GitHub repo.
