In this tutorial, we will build a blog site with Gatsby and Webiny Headless CMS. We will look at how to set up Webiny and Gatsby projects. We will create content models & data in Webiny CMS and learn how to consume this data in a Gatsby application. Before you proceed, please make sure you have the following prerequisite information.
- Have a fundamental knowledge of React
- You should have a basic understanding of how data is shared among React components
- You can go over how to set up a Webiny project in this section
- Alternatively, you request a live demo account, if you don’t want to go through the hassle of setting up a Webiny project from scratch
Creating a Gatsby Project
Please make sure you go over the prerequisites in the section above. The third item is important, please do not skip the process. When you're done with that section, let's get started by setting up a Gatsby project by installing the Gatsby CLI (Command Line Interface) tool with the commands below.
The command below does that for us. Alternatively, you can use gatsby init [project name]
# install gatsby's CLI tool first
npm i -g gatsby-cli

# create a new gatsby-site
gatsby new webiny-blog
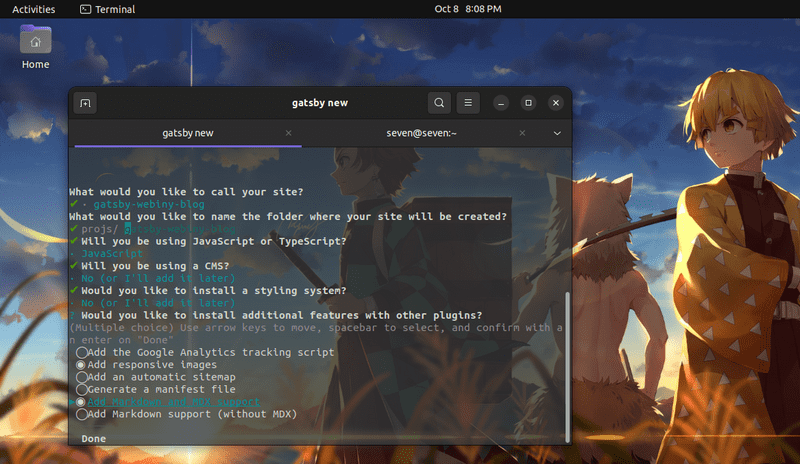
When you run the command below, you see something similar to the image below in your terminal. If you don't want to answer these questions, you skip them by adding the -y flag to the commands above
Gatsby uses a file-based API for its routing technique, which in turn reduces the amount of time spent when creating traditional react applications with create-react-app. Now let's take a look at the files in the project folder. In this guide, we'll be using some plugins to create a blog with Webiny's Headless CMS.
For brevity's sake we'll be taking a look at the important files in the project structure, take a look at them below. Starting from the ground up, we'll observe the functions of each file in the project.
.
├── src/
│   ├── components/
│   │   ├── Header.js
│   │   └── Post.js
│   ├── pages/
│   │   └── index.js
│   ├── styles/
│   │   ├── _variables.css
│   │   └── globals.css
│   └── templates/
│       └── blog-post.js
├── .env
├── gatsby-browser.js
├── gatsby-config.js
└── gatsby-node.js
gatsby-node.jsis where we get access to all the Node.js functionalities in a Gatsby site. Here, we'll get access to some APIs that we can use to create pages dynamically.gatsby-config.jscontains the default configurations that are pre-bootstrapped in a Gatsby site. We'd proceed to add other configs and plugins as we progress.gatsby-browser.jsthink of this file a little bit like the entry point file in a React app that is bootstrapped with CRA — index.js — or a React app bootstrapped with Next.js. Typically, these files appear like so:
// the entry point in a CRA project
import App from './App'
import React from 'react'
import ReactDOM from 'react-dom'

ReactDOM.render(<App />, document.getElementById('#root'))

// the entry point in a Next.js project
export default function Home({ Component, ...pageProps }) {
  return <Component pageProps={pageProps} />
}
In gatsby-browser.js, the syntax looks similar to the snippet below. Here, you can import your styles, so they can be propagated throughout the app.
// gatsby-browser.js
import React from 'react'
import './src/styles/globals.css'
import './src/styles/_variables.css'

export const wrapRootElement = ({ element }) => {
  return <React.Fragment>{element}</React.Fragment>
}
.envis where we'll keep the API key and the URL of the endpoint we'll be pulling data from.templatesthe templates folder holds the layout of the individual blog posts we'll be generating from the slugs.styles: the styles folder houses our styles — as the name impliespages: this is where we'll render all the articles we'll pull from the GraphQL APIcomponents: holds all the components that we want to reuse across the app.
Installing Crucial Plugins and Dependencies
In the previous section, we walked through the project structure of the application and the role that every file plays. We'll start by installing and setting up the gatsby-config.js file in this section, Let's start by installing the dependencies.
If you type the command in the first section above and say, you selected the images options, plugins like gatsby-source-filesystem and gatsby-plugin-image will be pre-installed for you.
npm i styled-components dayjs gatsby-source-filesystem gatsby-plugin-styled-components gatsby-source-graphql dotenv gatsby-plugin-google-fonts
You can always check the gatsby-config.js and package.json files to ensure the dependencies you have installed are appropriate.
We'll be using the gatsby-source-filesystem and gatsby-source-graphql to query the list of articles we have from our content models and create pages programmatically with the slugs associated with these articles.
This is what our gatsby-config file looks like, you can remove whatever doesn't work for you.
// gatsby-config.js

require('dotenv').config({
  path: `.env`,
})

module.exports = {
  siteMetadata: {
    title: `Webiny blog`,
    siteUrl: `https://gatsby-webiny-blog.netlify.app`,
  },
  plugins: [
    `gatsby-plugin-styled-components`,
    {
      resolve: `gatsby-source-filesystem`,
      options: {
        name: `pages`,
        path: `${__dirname}/src/pages`,
      },
    },
    {
      resolve: `gatsby-plugin-google-fonts`,
      options: {
        fonts: [`roboto-mono`, `muli\:400,400i,700,700i`],
        display: 'swap',
      },
    },
    {
      resolve: `gatsby-source-graphql`,
      options: {
        typeName: 'Webiny',
        fieldName: 'webiny',
        url: process.env.API_URL,
        headers: {
          Authorization: `Bearer ${process.env.WEBINY_API_SECRET}`,
        },
      },
    },
  ],
}
In the snippet above, we're using the dotenv library to access the node object — process() — so we can use it to access the credentials we have stored in our .env file
# .env

API_URL=https://XxxxxxxX.cloudfront.net/cms/preview/en-US
WEBINY_API_SECRET=XXXXXX
The last block in the plugins array uses gatsby-source-graphql which enables us to add our "Webiny" instance to Gatsby's graphql data layer so that we can have access to the content models we've created already through Gatsby.
// gatsby-config.js
{
  resolve: `gatsby-source-graphql`,
  options: {
    typeName: 'Webiny',
    fieldName: 'webiny',
    url: process.env.API_URL,
    headers: {
      Authorization: `Bearer ${process.env.WEBINY_API_SECRET}`,
    },
  },
},
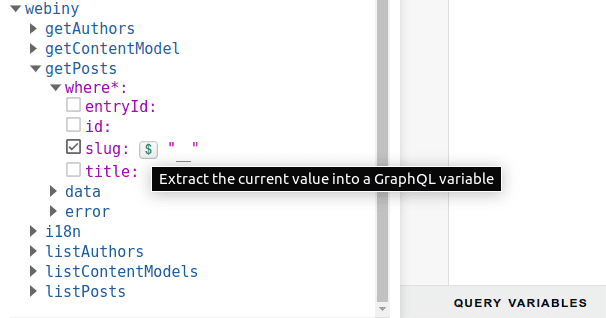
You can decide to change the value you assign to your typeName key to whatever pleases you. Just make sure that it is reflected in the GraphiQL playground, like so:
To access the GraphiQL playground, you can navigate to [localhost:8000/___graphql](http://localhost:8000/___graphql) Note: after the forward slash, we have three underscore signs, then, the spelling of graphql
The process of setting up the gatsby-config file with the appropriate configs is crucial when you're creating a Gatbsy site. You have to make sure that all the necessary plugins you want to use are appropriately placed in that array.
An example of the consequences attached to skipping or forgetting to add a particular plugin like gatsby-plugin-styled-component in the plugins array results in having a build process failure in production — i.e. when you deploy your project on platforms like Netlify.
You'll find out that the styles you've written perfectly well, worked fine in development mode, but when you ship your code, in production, these styles do not just get applied across the whole project, during the first page-load, these styles won't be applied to the elements in the DOM.
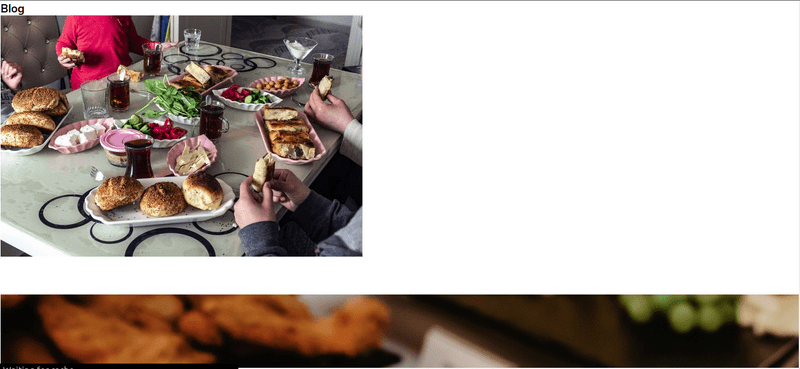
But when you navigate to another page and return to the homepage everything works fine. Below, you'll see how the blog looks like when the styled-components plugin was omitted from gatsby-config.js
Just to be on the safer side and prevent your blog from having unnecessary layout shifts, you should make sure that the configs you're setting up are done meticulously.
Querying the List of Posts
Let's move on to the next step which involves getting the list of blog posts from our endpoint and rendering them on the index page. To accomplish this, we'll be modifying the contents of pages/index.js, the snippet below illustrates that.
// pages/index.js
import * as React from 'react'
import Header from '../components/Header'
import { graphql } from 'gatsby'
import { BlogPostSection } from '../styles/home.styled'
import Post, { FeaturedPost } from '../components/Post'

const IndexPage = ({ data }) => {
  let posts = data.webiny.listPosts.data
  const latestPost = posts[0]

  return (
    <React.Fragment>
      <main style={{ border: '1px solid #fff', height: '100vh' }}>
        <Header />
        <BlogPostSection>
          <FeaturedPost data={latestPost} />
          {posts.slice(1)?.map((items) => {
            return <Post data={items} key={items.id} />
          })}
        </BlogPostSection>
      </main>
    </React.Fragment>
  )
}

export default IndexPage

export const posts = graphql`...`
The snippet above shows the structure of our index components and some other components — like the <BlogPostSection />, <FeaturedPost />, and <Post /> — that it is dependent on. The last function declaration uses the graphql module of Gatsby to query the posts from our API endpoint.
Let's break this IndexPage component down a bit further by going over the structures of the components in it.
Data fetched from the posts GraphQL function is passed through the context parameter, and it is destructured as a prop so that we can get access to the content.
Take a look at the GraphQL query below, you can decide to simply copy the snippet below if your content models are quite similar to the one being used in this guide or you can just go ahead and make use of the GraphiQL playground to generate yours.
export const posts = graphql`
 query posts {
    webiny {
      listPosts(sort: createdOn_DESC) {
        data {
          id
          slug
          title
          excerpt
          createdOn
          featuredImage
          author {
            name
          }
        }
      }
    }
  }
`
This data can be accessed by using JavaScript's dot notation when we're trying to access the properties in an object and since GraphQL queries are great examples of nested objects, we can use the destructuring assignment in JavaScript to access the data property.
So instead of doing something like so;
let posts = data.webiny.listPosts.data
It becomes
const {
  data: {
    webiny: {
      listPosts: { data },
    },
  },
} = posts
You can go with any approach that you're comfortable with. The <Header /> component is a React component that exports the word "Blog" in the topmost part of the page. I trust you'd rely on your creativity to build something more fascinating than what we have currently. Once again, you'd have to go with whatever suits your use-case.
The <BlogPostSection> component provides a little padding around the content on the page and some media queries that conditionally set how these paddings are to be applied on different device widths. You can take a look at the content below.
// styles/home.styled.js

export const BlogPostSection = styled.section`
  margin-top: 80px;
  padding: var(--desktop-pad);
  display: flex;
  flex-wrap: wrap;
  justify-content: space-between;

  @media only screen and (min-width: 0px) and (max-width: 576px) {
    padding: var(--mobile-sm-pad);
  }

  @media only screen and (min-width: 577px) and (max-width: 768px) {
    padding: var(--mobile-md-pad);
  }
`
The <FeaturedPost /> component holds an entirely different UI for the latest article, intended to get the attention of people visiting your blog for the first time. The logic behind this component relies on the process of accessing the latest post in the posts array.
Although, there are a lot of approaches around the implementation of this feature, the simplest one — at least, for me — is to get the first element with its current index in the array, and pass the details in it as props when using it
// pages/index.js
const latestPost = posts[0]

return <FeaturedPost data={latestPost} />
With that out of the way, you'd proceed to render the remaining articles on the page. But, you don't want to render the featured article among the list of articles again right? So you'd employ the Array.prototype.slice() method of JavaScript to return a copy of the posts array from a particular portion or index.
The ideal thing to do would involve us returning the remaining articles without the latest one, and since we already know that the current index of the latest article is 0 — zero. The next index will be 1 — one — then we can proceed by mapping the results from this newly obtained shallow copy of the posts array to the page.
// pages/index.js
{
  posts.slice(1)?.map((items) => {
    return <Post data={items} key={items.id} />
  })
}
The structure of the <Post /> component can be seen below. You'd notice how we're using JavaScript's destructuring assignment here too — to avoid repetition.
import React from 'react'
import styled from 'styled-components'
import { Link } from 'gatsby'
import dayjs from 'dayjs'

const Card = styled.div`...`

export default function Post({
  data: {
    id,
    slug,
    title,
    createdOn,
    featuredImage,
    author: { name },
  },
}) {
  return (
    <Link to={slug} style={{ textDecoration: 'none', color: '#000' }}>
      <Card>
        <img src={featuredImage} alt={`${title}'s cover`} />
        <div className="article-info">
          <p className="article-title">{title}</p>
          <div className="footnote">
            <p className="author">{name}</p>
            <p className="date">{dayjs(createdOn).format('MMMM, D, YYYY')}</p>
          </div>
        </div>
      </Card>
    </Link>
  )
}
In the snippet above, you'll notice that there's an inline style applied to the <Link /> component of Gatsby, this was done to override the default style of the component, you can learn more about it here. The dayjs library was used to format the date we've fetched from the API endpoint into human-readable text for people.
Building Dynamic Pages From the Slugs
Having a list of posts on the index page isn't enough. What happens when people click on these blog-post card components? Where are they redirected to? How do we build and or render the contents of an article when it is clicked on?
Well, this is where the gatsby-node.js file comes in. We'll be tapping into the APIs that Gatsby provides us through Node.js. One of them is the createPages() API, and as the name implies, we'll be using it to create dynamic pages from the slugs. The snippet below shows the content of this file.
// gatsby-node.js

const path = require('path')

exports.createPages = async ({ graphql, actions, reporter }) => {
  const { createPage } = actions

  const blogPost = path.resolve('src/templates/blog-post.js')

  const result = await graphql(`
    query Posts {
      webiny {
        listPosts(sort: createdOn_DESC) {
          data {
            id
            title
            slug
            excerpt
            createdOn
            featuredImage
            author {
              name
              picture
            }
            body
          }
        }
      }
    }
  `)

  if (result.errors) {
    reporter.panicOnBuild(
      `There was an error loading your blog posts`,
      result.errors
    )
    return
  }

  const posts = result.data.webiny.listPosts.data

  // Create blog posts pages
  if (posts.length > 0) {
    posts.forEach((post, index) => {
      createPage({
        path: post.slug,
        component: blogPost,
        context: {
          id: post.id,
          body: post.body,
          slug: `${post.slug}${post.id}`,
          title: post.title,
          createdOn: post.createdOn,
        },
      })
    })
  }
}
In the snippet above we're destructuring the createPage function from the actions argument, and then utilizing this function to map through all the articles we get from our content model.
const posts = result.data.webiny.listPosts.data

if (posts.length > 0) {
  posts.forEach((post, index) => {
    createPage({
      path: post.slug,
      component: blogPost,
      context: {
        id: post.id,
        body: post.body,
        slug: `${post.slug}${post.id}`,
        title: post.title,
        createdOn: post.createdOn,
      },
    })
  })
}
The result variable is appended onto a new variable called posts in the snippet, which is what is used to loop through all the article content.
In the createPage object above, you'll notice that we've assigned the slug of each post to the path property, and in the context object, you will see that we've used the string literal syntax of JavaScript to concatenate the slug of the article with the id associated with it.
So, a blog post with an initial URL of https://example-blog.com/sequel-to-graphql will be similar to something below.
https://example-blog.com/sequel-to-graphql7ad449a2053b34ea24cc4e79c745f
What's the essence of this? You might ask me. Well...this addition of the unique id to the URL of the blog post helps to eradicate the issue of articles with the same slug.
You may also want to go with the fact that: "well... it is my blog and I am the only one in charge of creating the articles, so I keep track of the slugs", and yes you are right, but if you happen to manage a very huge blogging platform, say, DEV, for example, you may want to consider using this pattern of creating dynamic pages.
The object properties in the context object will be passed as props to the blogPost template component which we can obtain from the templates folder. In the snippet below, we use the path module of Node.js to resolve the location of the template in such a way that the createPage API will understand.
const blogPost = path.resolve('src/templates/blog-post.js')
Below, you'll find the layout of the blogPost template, and you'll see how we're using Webiny's Rich Text Renderer package to transform the content in the body property.
import React from 'react'
import { RichTextRenderer } from '@webiny/react-rich-text-renderer'
import styled from 'styled-components'
import dayjs from 'dayjs'
import { Link } from 'gatsby'

const PostWrapper = styled.section`...`

export default function BlogPost({ pageContext }) {
  const { title, body, createdOn } = pageContext

  return (
    <React.Fragment>
      <PostWrapper>
        <Link to="/" style={{ color: '#000', textDecoration: 'none' }}>
          Go back
        </Link>
        <div className="article-info">
          <h1 className="article-title">{title}</h1>
          <p className="article-date">
            {dayjs(createdOn).format('MMMM, DD, YYYY')}
          </p>
        </div>
        <RichTextRenderer data={body} />
      </PostWrapper>
    </React.Fragment>
  )
}
In the snippet above, you'll notice how the destructuring assignment operation is used. If you have not installed the RichTextRenderer, you can do that by typing the command below.
npm i @webiny/react-rich-text-renderer
Wrapping Up
You've read this guide up to this point, now you can view the project in the browser by typing this command npm run develop. If everything works fine, you should see a page running on localhost:8000. Thank you for reading!
You can check this repository out for the source code of this guide, and the live demo
This article was written by a contributor to the Write with Webiny program. Would you like to write a technical article like this and get paid to do so? Check out the Write with Webiny GitHub repo.


